 Pin It
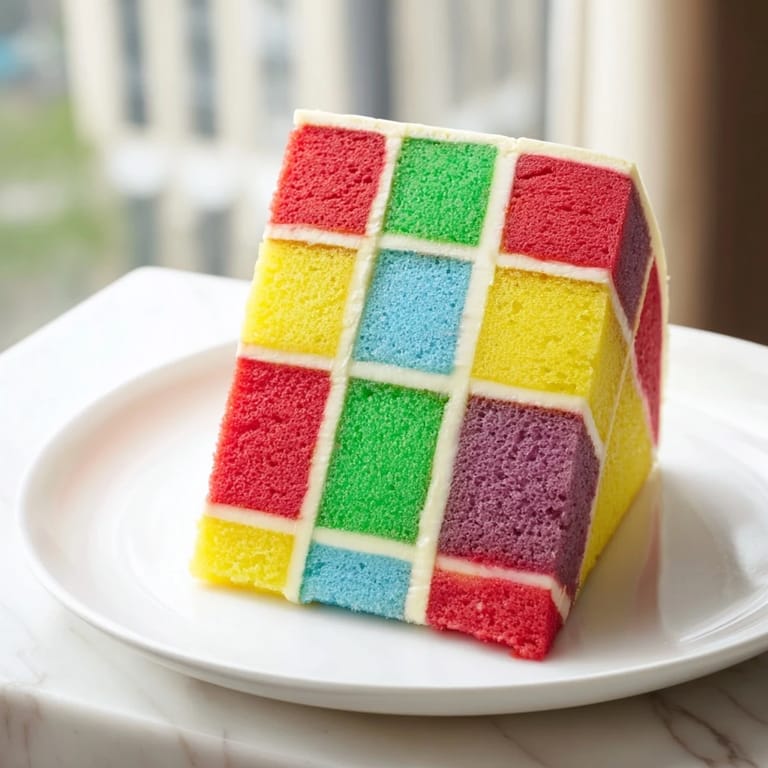
 I still remember the afternoon my grandmother pulled out her old quilt from the linen closet, spreading it across the kitchen table with such care. The patchwork of fabrics in jewel tones—ruby red, golden yellow, forest green, and deep blue—inspired me to create something edible that captured that same warmth and artistry. That's when I imagined a cake that would be as visually stunning as her quilt, with colorful layers woven together like fabric squares. The first time I made it, my kitchen transformed into this magical creative space, flour dust catching the light as I carefully arranged each colored square. Now, whenever I bake this cake, I'm transported back to that quiet moment with her.
I'll never forget baking this for my daughter's tenth birthday party. The moment she walked into the kitchen and saw that patchwork masterpiece on the counter—her eyes went so wide. She immediately wanted to help arrange the final squares, and suddenly it wasn't just a cake anymore; it was our creation together. We added extra buttercream between the layers as we built, and she laughed when I let her taste the batter. That's when I realized this cake is really about the journey, not just the destination.
Ingredients
- All-purpose flour (350 g): The foundation that keeps your sponge tender and light—don't skip sifting or you'll trap unwanted air bubbles
- Granulated sugar (300 g): This creams with butter to create tiny pockets that make the cake impossibly soft; measure carefully for consistent results
- Baking powder (2½ tsp): The secret to lift that rises evenly across all five colored batches—I learned this the hard way after one cake stayed stubborn
- Salt (½ tsp): A pinch that makes everything taste more like itself, bringing out the vanilla's warmth
- Unsalted butter, softened (250 g): Room temperature is non-negotiable here—cold butter won't cream properly and you'll lose that fluffy texture
- Large eggs (4): They bind everything together and add richness; bring them to room temperature so they incorporate smoothly
- Whole milk (250 ml): Creates a tender crumb; cold milk straight from the fridge works best
- Vanilla extract (2 tsp): The understated hero that lets the colors shine without overwhelming the palate
- Food coloring gels (red, yellow, green, blue, purple): Use gel, never liquid—it won't dilute your batter and the colors stay vibrant and true, like stained glass
- Unsalted butter for frosting (350 g): Softened to that perfect spreadable texture that holds shape without being greasy
- Powdered sugar (500 g): Sifted first, always, to avoid grainy frosting that won't smooth properly
- Milk for frosting (3–4 tbsp): Added gradually until you reach that sweet spot between thick and pipeable
Tired of Takeout? 🥡
Get 10 meals you can make faster than delivery arrives. Seriously.
One email. No spam. Unsubscribe anytime.
Instructions
- Prepare your canvas:
- Preheat your oven to 180°C, then grease and line five 20 x 20 cm square pans with parchment paper. If you don't have five pans, don't worry—bake in batches, wiping the pans clean between rounds. I learned this tip when my first kitchen didn't have the space.
- Create the base batter:
- In a large bowl, cream the softened butter and sugar together until the mixture is pale, fluffy, and looks almost cloud-like—this takes about 3 minutes with an electric mixer. Beat in your eggs one at a time, waiting for each to fully incorporate before adding the next. The mixture should look creamy and voluminous.
- Combine your dry ingredients:
- In a separate bowl, whisk together the flour, baking powder, and salt. This aeration matters more than you'd think—it helps everything distribute evenly.
- Build the batter carefully:
- Starting with the flour mixture, alternate adding it with the milk to your creamed butter and eggs, beginning and ending with flour. After each addition, fold gently with a spatula until just combined. Overmixing develops gluten, which makes the cake tough instead of tender.
- Divide and color:
- Pour the batter evenly into five bowls. Using gel food coloring, add a few drops to each bowl and stir gently until the color is even throughout. The first color I add is always red—it's so satisfying to watch the transformation.
- Bake your rainbow:
- Pour each colored batter into its prepared pan, spreading it gently to the edges. Bake for 20–25 minutes, until a toothpick inserted in the center comes out clean or with just a few moist crumbs. The cakes should spring back slightly when you touch them.
- Cool with patience:
- Let the cakes cool in their pans for 10 minutes—this prevents them from breaking—then turn them out onto wire racks to cool completely. Resist the urge to rush; warm cake crumbles and tears.
- Prepare your frosting:
- Beat the softened butter until it's creamy and pale, about 2 minutes. Gradually add your sifted powdered sugar, beating on low speed to avoid a sugar cloud in your kitchen. Add vanilla and salt, then milk one tablespoon at a time until the frosting reaches a thick but spreadable consistency.
- Cut your squares:
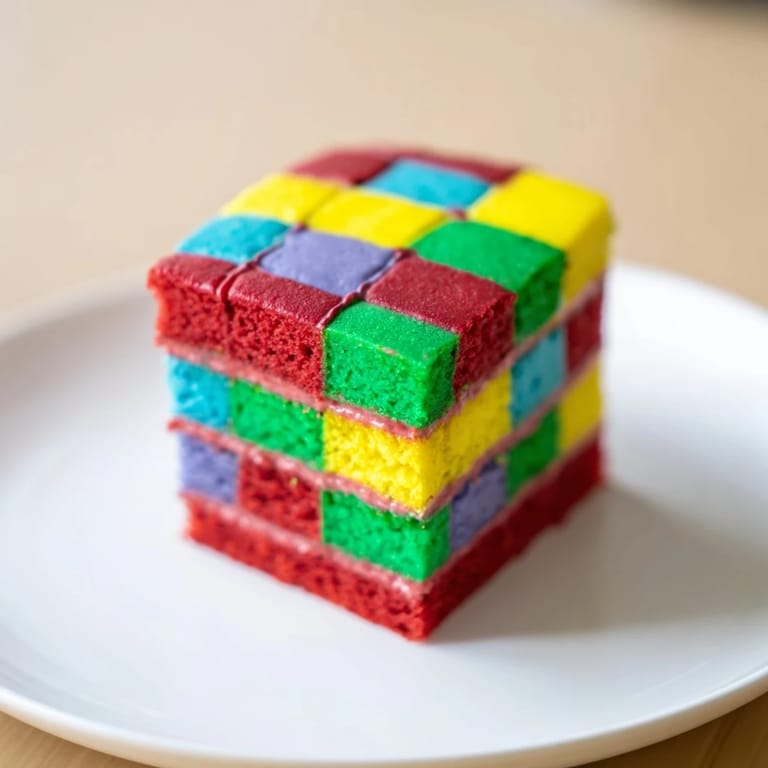
- Once the cakes are completely cool, trim the edges straight with a serrated knife, then slice each cake into uniform 3 x 3 cm squares. I lay a ruler beside the knife to keep my cuts even.
- Arrange your patchwork:
- On a large serving tray or cake board, start arranging your colored squares in an alternating pattern, like a real quilt. Spread a thin layer of buttercream between squares as you go—think of it as the thread holding fabric together. Build upward in layers, rotating your color pattern so the top looks as intentional and beautiful as a real quilt.
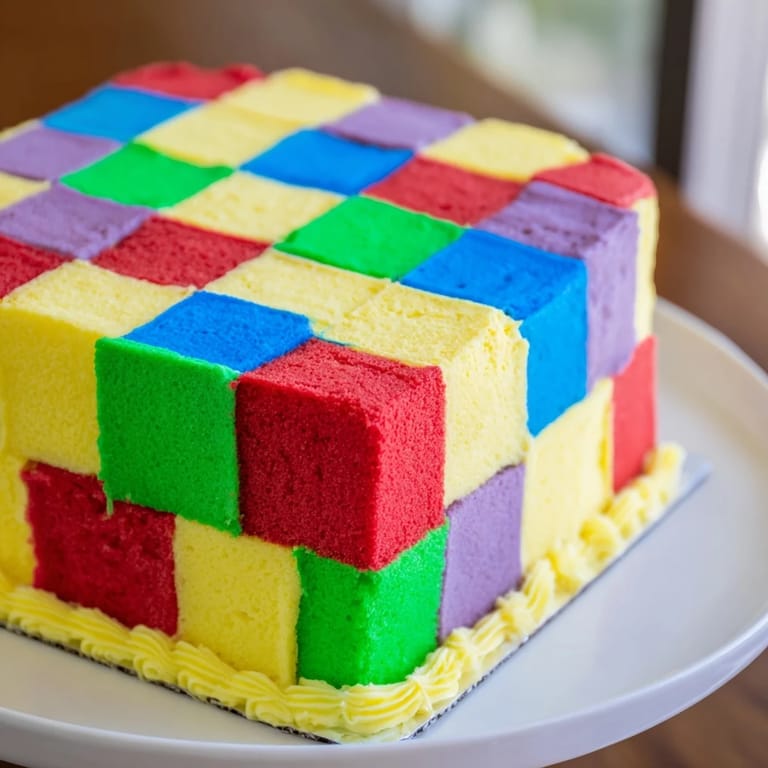
- Finish and refine:
- Cover the top and sides with a thin layer of buttercream, smoothing it as much as possible. If you want to emphasize the patchwork effect, pipe buttercream lines along the seams with a piping bag. The extra detail makes it feel truly handcrafted.
- Final chill:
- Refrigerate for at least 30 minutes before slicing and serving. This lets the buttercream set and makes clean slices possible.
 Pin It
 What I didn't expect was how this cake would become a tradition. Now friends ask me to make it for their celebrations, and each time I do, I think about the care that goes into every layer. It's taught me that the most impressive desserts aren't about complexity—they're about intention and taking your time to get the details right.
Making This Cake Your Own
The beauty of this recipe is how customizable it truly is. Add the zest of a lemon or orange to the batter for brightness, or stir in almond extract instead of vanilla for something more sophisticated. I once made it with lavender-infused milk and added tiny edible flowers between the squares, and it became something magical. You could also experiment with different color combinations—pastels feel spring-like, while jewel tones feel cozy and autumnal. The structure stays the same; only your creative vision changes.
Serving and Storage
This cake is best served at room temperature so the vanilla sponge stays tender and the buttercream is silky rather than stiff. A simple dollop of lightly sweetened whipped cream beside each slice adds elegance, and fresh berries scattered around the plate bring freshness that balances the richness. Covered loosely with a cake dome, it keeps beautifully in the refrigerator for three days, though I've never had leftovers last that long.
Why This Cake Works Every Time
The secret to success is understanding that patchwork cakes are really about architecture and precision. Once you've arranged the squares once, you understand the logic of the pattern, and the next time feels effortless. This cake has taught me that many things in life—and in baking—become easier with practice and intention.
- Always let your cakes cool completely before cutting; warm cake tears and crumbles no matter how careful you are
- If one square breaks, simply use it for a tasting treat and let yourself enjoy the imperfection
- Make this cake one day ahead if you can; the flavors mellow and the structure sets, making it easier to slice cleanly
 Pin It
 This patchwork cake isn't just a dessert—it's a reminder that the most meaningful creations require patience, planning, and a little bit of color. I hope it brings as much joy to your table as it has brought to mine.
Recipe Questions & Answers
- → How do I achieve vibrant colors in the sponge layers?
Use gel food coloring gels as they provide intense hues without thinning the batter, ensuring vibrant and well-textured sponges.
- → Can I prepare this cake gluten-free?
Yes, substitute all-purpose flour with a 1:1 gluten-free flour blend to maintain texture and structure while accommodating dietary needs.
- → What is the best way to assemble the patchwork pattern?
Trim each colored sponge into uniform squares and arrange them alternately on a tray, using a thin layer of buttercream between pieces to secure and build layers.
- → How long should the cake be chilled before serving?
Chill the fully assembled cake for at least 30 minutes to allow the buttercream to firm up and the patchwork design to hold its shape when sliced.
- → Any tips for smooth buttercream frosting?
Beat softened butter until creamy before gradually adding powdered sugar, vanilla, and milk. Continue mixing until fluffy for an easy-to-spread consistency.
- → Can I add extra flavors to the sponge batter?
Yes, incorporating citrus zest or almond extract can enhance the flavor profile without altering the cake's texture.